The Intrinsic Value of the Interior Shell: Beyond Simple Drywall
The perception of interior wall construction often defaults to the generic term “drywall,” overlooking the sophisticated processes, material engineering, and skilled labor required to achieve a truly monolithic, structurally sound, and aesthetically flawless interior shell.
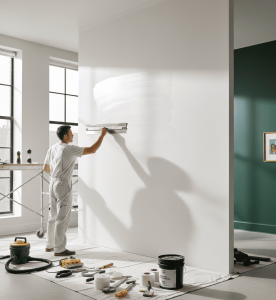
For high-end finishing contractors like Pedroza’s Painting Services Inc., the quality of the gypsum wallboard substrate is the absolute non-negotiable determinant of the final paint finish’s longevity and visual success.
A flawed foundation will inevitably reveal itself through “flashing,” cracking, or screw pops, especially under the critical illumination of modern residential and commercial spaces.
This detailed analysis moves past the common understanding of wall assembly to delve into the stringent requirements, advanced materials, and precise execution necessary for constructing interior envelopes that meet or exceed the rigorous Level 5 finish standards, essential for the application of premium coatings.
The process is vertically integrated, starting with the selection of the correct panel type, through the precise tolerances required in framing, and culminating in the multi-stage, technically demanding process of joint treatment and sanding.
Achieving the required smoothness and uniformity is not merely a matter of applying joint compound, but a highly specific system of material chemistry, moisture control, and precise application techniques designed to create a single, continuous plane ready for high-gloss, semi-gloss, or even flat architectural paints in challenging lighting conditions.
The decision to invest in a superior gypsum installation is, fundamentally, an investment in the long-term performance and perceived quality of the entire built environment.
Structural Prerequisite: The Unseen Foundation of Framing Perfection
The stability and flatness of the finished wall are wholly dependent on the structural integrity and precision of the underlying framing.
Whether using wood studs or light-gauge steel, any deviation, warp, or misalignment in the supporting framework will transfer directly to the gypsum panels, resulting in visible undulations or “waves” that no amount of joint compound can fully conceal.
Framing Tolerances and Alignment
Professional installation demands that the face of all studs, plates, and headers (the structural members that receive the drywall) be aligned within extremely tight tolerances, often less than 1/8 inch over a 10-foot span.
Plumb and True: Studs must be perfectly plumb (vertical) and the overall wall plane must be true (flat). In wood framing, this often requires minor shimming or planing of individual studs to ensure a co-planar surface across the entire wall before the first panel is hung.
Optimal Spacing: Studs must be installed on strict center spacing, typically 16 inches or 24 inches. Deviations can lead to panel sagging, particularly in ceilings, or insufficient support at panel edges, leading to cracking when stressed.
Framing for Corners and Openings: Additional blocking and specialized framing techniques must be employed around openings (doors, windows) and corners to ensure rigidity and provide continuous support for the edge of every gypsum panel, preventing movement that causes cracks in the finished joint compound.
Load Considerations for Ceilings
Ceilings require even greater attention. The weight of the gypsum, insulation, and potential future textures necessitates using 5/8 inch thick panels, which resist sag better than 1/2 inch alternatives.
The framing must be rigid, and in some high-humidity applications, advanced techniques like using resilient channels (RC-1) can be employed. While RC-1 is primarily an acoustic feature, it also helps isolate the panel from minor structural movement in the joists, improving finish integrity.
Material Science: Selecting and Handling Advanced Gypsum Panels
The correct choice of gypsum panel is the first line of defense against the specific environmental and functional stresses of a space. Modern wallboard is a composite material tailored for diverse performance requirements.
Beyond the Standard Panel: Specialized Performance
While the standard Regular Gypsum Board offers fire resistance and is the most common, high-performance environments require specialized materials:
Moisture/Mold-Resistant Panels (Green Board/Purple Board): These feature a chemically treated core and paper facing to inhibit mold and mildew growth. Crucially, they should be used in all areas subject to elevated, sustained humidity, such as bathrooms, laundry rooms, and basement walls. Misapplication is a common failure point; these are NOT substitutes for cement board in wet areas like shower enclosures.
Type X Fire-Rated Panels: The incorporation of glass fibers within the gypsum core allows the panel to maintain structural integrity longer under fire conditions, slowing the spread of fire. This is mandatory for partition walls between a garage and living space, fire-rated corridors, and multi-family dwelling separations.
Acoustic Panels: Utilizing higher density cores or constrained layer dampening technologies (viscoelastic polymers sandwiched between two layers of gypsum) drastically improves the Sound Transmission Class (STC) rating, providing critical acoustic privacy in home theaters, bedrooms, or offices.
Handling and Acclimation
Gypsum panels are heavy and brittle. Improper handling (e.g., carrying them flat) can lead to breakage. Furthermore, like all building materials, panels must be acclimated to the environment in which they will be installed.
Storing panels in extremely cold or wet conditions and then installing them can lead to moisture variation, causing stress, bowing, and joint movement after installation and subsequent drying. Optimal installation occurs when ambient temperature and humidity are consistent with future occupancy.
Precision Fastening: Securing the Panel and Preparing the Surface
The quality of the final finish depends directly on the fastening pattern and the depth setting of every screw.
Fastening Patterns and Stress Relief
The Double-Nail/Double-Screw System: While less common now due to improved fasteners and power tools, this technique involves placing two fasteners near each other to hold the board tightly, minimizing the chance of screw pops due to lumber shrinkage. Modern standards generally rely on a single screw every 12 inches on the wall plane and every 7 inches on the ceiling, using specialized drywall screws that penetrate the framing and resist pull-out.
Edge and Field Fastening: Panels must be fastened around the perimeter and across the field. Screws near the edges should be placed approximately 3/8 inch from the edge. Failure to secure all edges can lead to “flapping” or movement, which will break the joint compound.
The Perfect Dimple: Every screw must be set slightly below the paper surface, creating a “dimple.” The critical rule is to NEVER break the paper facing or tear the gypsum core. A torn paper face compromises the screw’s holding power, making it a prime candidate for a future screw pop after the structure settles. Precision power tools with clutch mechanisms are essential for this task.
Minimizing Joints and Utilizing Panel Layout
The most skillful technique involves minimizing the number and complexity of joints. Professional installers will:
Use Long Panels: Use the longest practical panel size (e.g., 14-foot or 16-foot lengths) to reduce the number of butt joints, which are significantly harder to hide than factory-tapered joints.
Stagger Joints: Joints should never stack vertically on adjacent sheets; they must be staggered (offset) from floor to ceiling to prevent a continuous weak line.
Orient Panels: Wherever possible, panels should be oriented horizontally (perpendicular to the studs) for walls. This creates one factory-tapered joint (horizontal) rather than two difficult butt joints (vertical), and the natural flexibility of the panel bridges minor stud variations more effectively.
The Alchemy of Joint Treatment: Achieving Monolithic Smoothness
Joint treatment is where the rough construction transforms into the fine finish. It is a multi-step, multi-material process that requires drying time, temperature control, and a systematic application of specialized compounds.
Compound Chemistry and Selection
The application sequence dictates the compound type:
| Compound Type | Primary Use | Key Advantage | Notes on Application |
| Setting-Type (Hot Mud) | First (Bed) Coat, large fills, rapid repairs. | Dries by chemical reaction; minimal shrinkage; hardens quickly. | Essential for securing tape; ideal when multiple coats are needed in one day. Not easy to sand. |
| All-Purpose (Ready-Mix) | Second (Fill) Coat, general smoothing. | Easy to apply and sand; strong adhesion. | Standard workhorse compound. Dries by evaporation (requires low humidity/warm temps). |
| Lightweight Finish | Third (Finish) Coat, final skim coat. | Extremely easy to sand; minimal weight. | Used to achieve the final, feather-thin, flawless surface before priming. Less durable than all-purpose. |
The Five-Pass System for Level 5 Finish
While a “three-coat” process is commonly referenced, achieving a true Level 5 finish often involves five precise passes, utilizing increasing joint compound width to feather the edge seamlessly into the field of the wall:
Bed Coat: Apply compound, embed paper tape (superior tensile strength to mesh) tightly, wiping excess. Width: 4-6 inches.
Drying: Allow complete, full drying of the bed coat (critical step often ignored).
Fill Coat (Second Pass): Applied over the tape to completely hide the paper. Feathered out approximately 2-3 inches beyond the first coat’s edges. Width: 8-10 inches.
Finish Coat (Third Pass): Applied wider to eliminate any slight ridges from the previous pass. Width: 12-14 inches.
Skim Coat (Fourth Pass – Entire Wall): A very thin, diluted coat of lightweight compound or Level 5 compound applied over the entire surface of the wall and ceiling panels. This step eliminates the textural and porosity difference between the joint compound areas and the original paper panel face.
Spotting/Detailing (Fifth Pass): Final touch-up of screw heads and minor imperfections after the first skim coat is dry.
The Final Surface: Sanding, Priming, and the Prevention of Pathologies
The final stages of installation are focused on creating the perfect canvas and locking in the integrity of the work.
Advanced Sanding Techniques
Sanding must be carried out in a systematic, controlled environment:
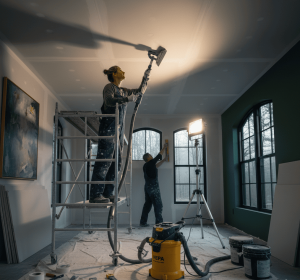
Tools for Quality: Use specialized drywall sanders (giraffes) coupled with powerful HEPA vacuum systems. This allows for superior dust control (critical for site cleanliness and health) and ensures a flatter, more uniform sanding motion across large surfaces compared to manual pole sanders.
Grit Selection: Sanding typically progresses from a medium grit (80-100 grit) for the fill coat, graduating to a finer grit (120-150 grit) for the final finish and skim coat. Over-sanding or using too coarse a grit can damage the paper facing, creating fuzzy paper that cannot be repaired without re-skimming.
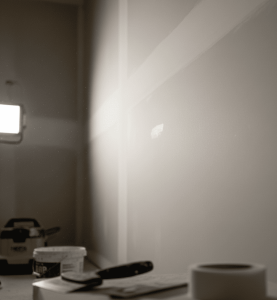
Lighting Check: The most effective method for quality control is raking light inspection. A strong work light is held parallel and close to the wall surface. This illumination technique exaggerates even the slightest ridge, depression, or tool mark, allowing the installer to locate and correct imperfections before priming.
Flashing, Ghosting, and Primer Application
Flashing and Ghosting are the most common failures of a paint finish applied over imperfect gypsum work. They occur because the joint compound (porous) and the paper surface (dense) absorb paint differently.
The Level 5 Solution: The mandatory skim coat (Level 5) applied over the entire surface creates a uniformly porous surface, drastically reducing the risk of differential absorption.
The Primer Requirement: A high-quality PVA (polyvinyl acetate) or specialty drywall primer/sealer is essential. This primer acts as a barrier, sealing the surface porosity and ensuring the topcoat paint adheres evenly, achieving consistent color depth and sheen across the entire wall. Without a proper primer, even a Level 5 finish can exhibit subtle variations in sheen (ghosting).
Durability and Performance: Integrating Insulation and Sound Control
A professional wall assembly contributes significantly to the building’s overall performance metrics – thermal efficiency, fire safety, and acoustic comfort.
Acoustic Decoupling
Simply adding batt insulation (fiberglass or mineral wool) to the wall cavity improves acoustic performance. However, maximum sound control is achieved through decoupling:
Resilient Channels (RC-1): Metal channels installed perpendicular to the studs. The gypsum board is screwed into the channel, not the stud. This mechanically separates the rigid drywall from the framing, effectively dampening vibration transfer and significantly increasing the STC rating.
Double Layering: Using two layers of gypsum board, optionally separated by a viscoelastic compound (like Green Glue), further increases mass and dampens sound energy.
Fire Safety Integrity
The fire-resistance rating of a wall assembly (e.g., 1-hour rating) is achieved only when the Type X gypsum board is installed precisely according to the manufacturer’s and local code specifications, including correct fastening, appropriate thickness, and ensuring all joints are properly filled. Fire-rated sealant must be used to seal penetrations (electrical boxes, pipes) to maintain the wall’s integrity.
Pedroza’s Painting Services Inc. – The Seamless Integration of Substrate and Finish
For Pedroza’s Painting Services Inc., the excellence of the paint application starts with the guaranteed perfection of the substrate. We view Level 5 Gypsum Finishing as an indispensable part of our premium painting service.
The Quality Assurance Commitment
By offering vertically integrated services (from the initial gypsum installation to the final coat) we eliminate the common failure points between trades. Our commitment ensures:
Accountability: Full accountability for surface perfection. If a paint failure occurs (flashing, ghosting), the underlying cause is addressed by the same team that prepared the surface.
Product Matching: We match the chosen compound (e.g., specialty low-shrink, high-density) and the finish level directly to the chosen coating (e.g., using Level 5 specifically for high-sheen enamel).
Guaranteed Drying: We strictly adhere to manufacturer drying specifications for compounds before proceeding to the crucial priming stage, a key factor in long-term joint stability.
Level 5 as the Standard for Premium Finishes
Our process includes a mandatory final inspection using raking light before the application of the primer. This final quality check ensures that the skim coat has perfectly masked all joints and surface imperfections, leaving a canvas that allows our premium paints to deliver the intended depth, consistency, and brilliant finish expected by our clients.
Frequently Asked Questions (FAQ) about Gypsum Wallboard Installation
What is the significance of “raking light” in quality control?
Raking light is a technique where a strong light source is held very close and parallel to the wall surface. This dramatically highlights minor imperfections (ridges, depressions, tool marks) that are invisible under normal or overhead lighting. It is the essential final test used by professionals to confirm that a Level 5 finish is truly seamless before any primer is applied.
When should paper tape be chosen over fiberglass mesh tape?
Paper tape is generally superior and the industry standard for flat seams and internal corners. Its main advantage is its high tensile strength and minimal stretch, which provides critical resistance against cracking. Fiberglass mesh tape is often self-adhesive and faster, but it is typically reserved for repairs, minor patches, or joints explicitly requiring an immediate hardening (setting-type) compound, as it offers less tensile strength than paper.
What is the required drying time for joint compound?
Drying time depends heavily on the compound type, ambient temperature, and humidity. Setting-type (hot) compounds harden in minutes or hours (e.g., 20, 45, or 90 minutes). Ready-mix compounds dry via evaporation and can take 24 to 72 hours, especially in cold or humid conditions. Crucially, the next coat or primer should NEVER be applied until the previous coat is completely dry throughout. Rushing this step is a leading cause of future cracking and shrinkage.
Does the direction the panel is hung (horizontal vs. vertical) matter?
Yes. Hanging panels horizontally (perpendicular to studs) is generally preferred for walls. This creates one long, tapered, horizontal seam (easy to hide) instead of multiple hard-to-hide butt joints (vertical). Horizontal application also allows the panel to bridge minor irregularities in stud alignment more effectively. Vertical hanging is used for narrow walls or when ceiling height dictates.
How does Pedroza’s Painting Services Inc. ensure the paint finish won’t peel or flake?
Peeling or flaking is often due to poor adhesion, often caused by dirt, dust, or moisture. Pedroza’s Painting Services Inc. prevents this by: 1) Thoroughly cleaning and dusting the surface after final sanding; 2) Applying the correct, dedicated drywall primer/sealer to ensure maximum adhesion to the porous substrate; and 3) Ensuring optimal environmental conditions (temperature and humidity) during both priming and finish coat application.
Is a skim coat necessary if I am using a textured finish?
While a skim coat (Level 5) is primarily intended for smooth finishes, it can still be beneficial for textured walls (Level 4, Level 3). Even under a texture, the skim coat creates a uniform substrate, ensuring that the primer and paint are absorbed consistently, which prevents the final color from appearing patchy or showing varying sheen levels (ghosting) across the surface.
Conclusion: Investing in the Foundation for Enduring Quality
The successful installation of gypsum wallboard is an exacting, multi-faceted discipline that directly dictates the longevity, aesthetics, and performance of any interior space. It is a critical investment where precision in framing, deliberate material selection, and the meticulous execution of a multi-stage finishing process separates standard construction from high-quality craftsmanship.
To ensure your high-end renovation meets the highest industry standards in 2026, we prioritize:
Subsurface Perfection: We believe excellence in the final paint finish is impossible without absolute confidence in the structural integrity and chemical preparation of the base.
Level 5 Finish Standards: For projects demanding a flawless surface, we implement a rigorous Level 5 finishing process to eliminate shadows and imperfections under critical lighting.
Integrated Craftsmanship: Our approach guarantees a visually flawless foundation that is perfectly prepared to receive premium coatings, providing enduring value to your property.
If you demand structural precision and an impeccable surface for your next project, do not compromise on the foundation. Contact us today to discuss your vision and receive a consultation that integrates professional Level 5 Gypsum Installation with our guaranteed premium finishing services, or call us directly at: (508) 501-9417